Deployment
In this section of the Guide, we will cover the following topics:
- Prerequisites and Best Practices
- Cloning iForm Terraform Repository
- Generating SSH keys
- Recommendations on Sizing
- Recommendation on Amazon RDS configuration
- Recommendation on Amazon EBS sizing
- Application Server configuration
- Recommendation on Bastion Server configuration
- Deployment
- iForm Removal
1. Prerequisites and Best Practices
This deployment solution, along with iForm, does not create any public resources in your AWS Account.
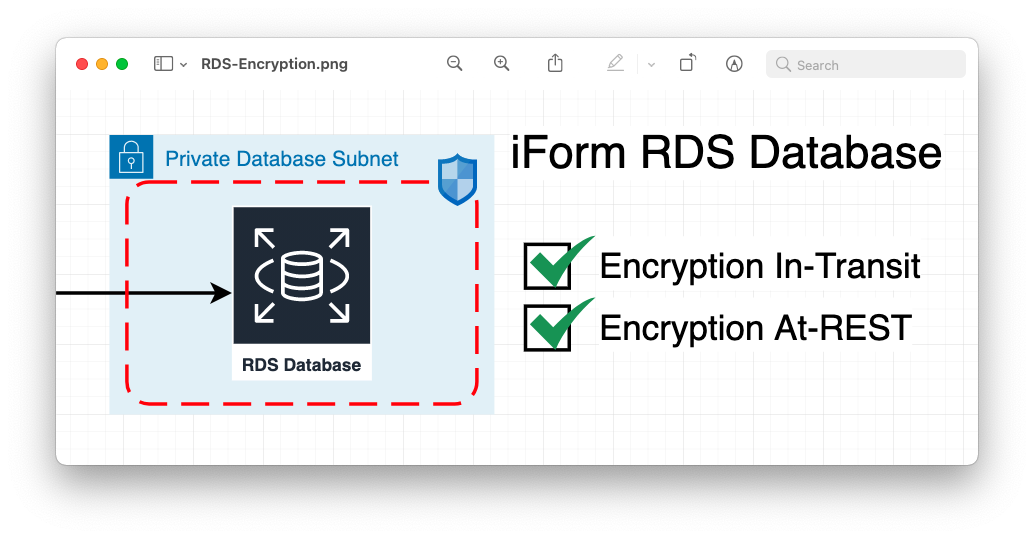
iForm Deployment Solution comes preconfigured with Amazon TLS/SSL certificate for RDS Database. That allows all traffic between the Application Server and RDS Database to be encrypted. The RDS database comes preconfigured with Encryption at REST, so your data is encrypted in-transit and at-REST.
In addition to balancing the load, Amazon Elastic Application Load Balancer offloads HTTPS traffic by using Amazon Certificate Manager. You don’t have to renew your SSL/TLS certificate, as it will be handled automatically by the Amazon Certificate Manager.
The iForm Deployment Solution will deploy iForm RDS Database and configure to use Encryption for data-in-transit and data at-REST by default.
The RDS database will keep information about enrolled families and related profile information.
The iForm uses an encrypted Amazon Elastic File System to store school-related information and various uploads.
1.1 Amazon IAM Application Server Role
To post Application and System logs to Amazon CloudWatch by the Application, the Deployment Solution creates and assigns the following IAM Role to the EC2 Application Server. The Deployment Solution does not require nor create any other Role or User – it follows the least-privilege principle accessing your AWS resources and services. The Application Server requires only the following list of Actions in the IAM Role Policy. See the Policy code below:
{
    "Version": "2012-10-17",
    "Statement": [
        {
            "Effect": "Allow",
            "Action": [
                "cloudwatch:PutMetricData",
                "ec2:DescribeVolumes",
                "ec2:DescribeTags",
                "logs:PutLogEvents",
                "logs:DescribeLogStreams",
                "logs:DescribeLogGroups",
                "logs:CreateLogStream",
                "logs:CreateLogGroup"
            ],
            "Resource": "*"
        },
        {
            "Effect": "Allow",
            "Action": [
                "ssm:GetParameter"
            ],
            "Resource": "arn:aws:ssm:*:*:parameter/AmazonCloudWatch-*"
        }
    ]
}
2. Cloning iForm Terraform Repository
Please use the following command to clone iForm Terraform Template from the GitHub repository.
git clone git@github.com:konstankinollc/iform-tf.git
3. Generating SSH keys
To deploy your iForm Solution, you must generate ssh keys first. You will need two ssh keys for the Bastion Server and Application Server. From the iform-tf directory, run the following two commands to generate ssh keys for each server, respectively.
ssh-keygen -t rsa -b 4096 -f ssh-keys/ssh-public-key-region-key-pair
ssh-keygen -t rsa -b 4096 -f ssh-keys/ssh-key-region-key-pair
4. Recommendations on Sizing
As a starting point, and to avoid overprovisioning and extra charges, we recommend using the following server types and sizing:
- Application Server -
t2.small - Bastion Server -
t2.nano - RDS Database Server -
db.t2.small
The Deployment Solution that comes with iForm will deploy three servers stated above with the corresponding sizing. We do not recommend deploying larger instances before you have a good understanding of the traffic you have and the load your iForm solution needs to handle.
After the iForm runs for some time, you will gain useful knowledge of your traffic and data volume, and application usage by monitoring your resource in the Cloud and having a clear understanding of what sizing you may require and when. You can easily change the size of each server at any time.
iForm stores user uploads in Amazon Elastic File System, which scales automatically.
Please note that you will be charged on an hourly basis for each service you run in your AWS Account. Some of the AWS Services will require upfront payment, such as Route53, to register a new domain.
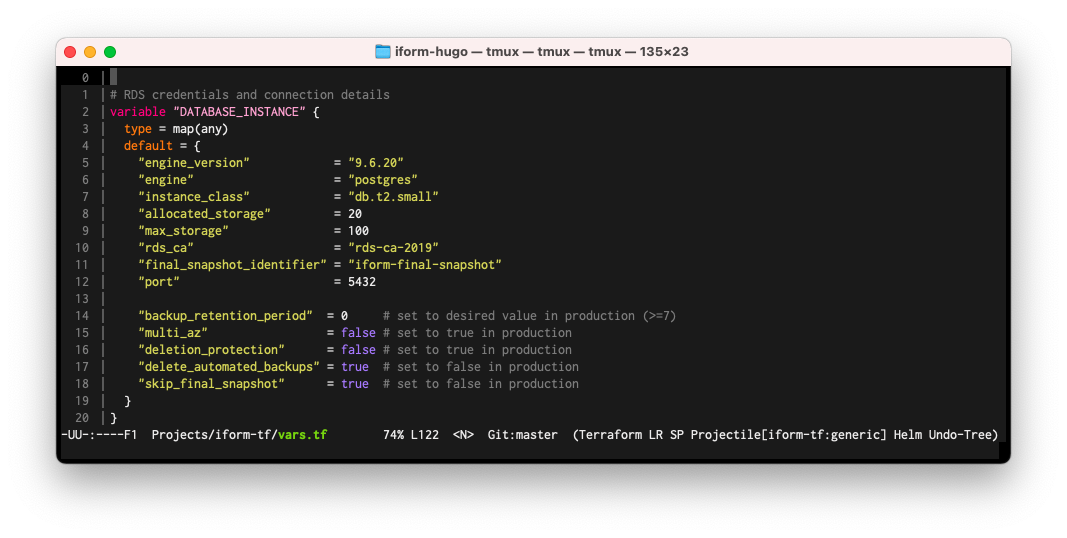
5. Recommendation on Amazon RDS configuration
There are a few more additional modification we would like you to consider before deploying your iForm Solution. Please note that changing multi_az to true will incur additional charges.
You can read more about Multi-AZ in Amazon RDS User Guide.
In the vars.tf file, locate the following lines and consider changing true and false parameters according to recommendations.
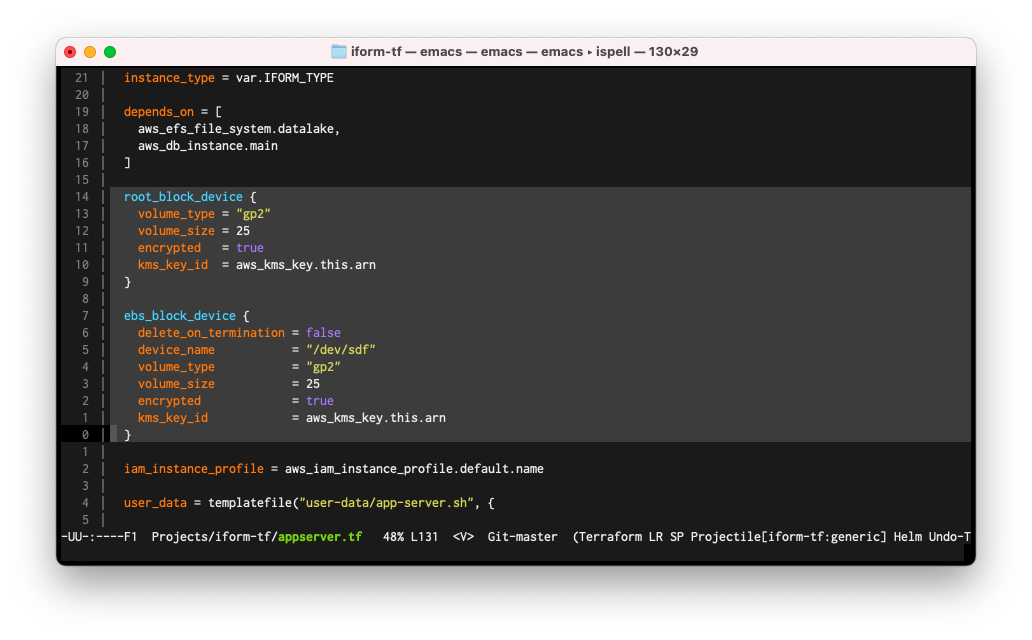
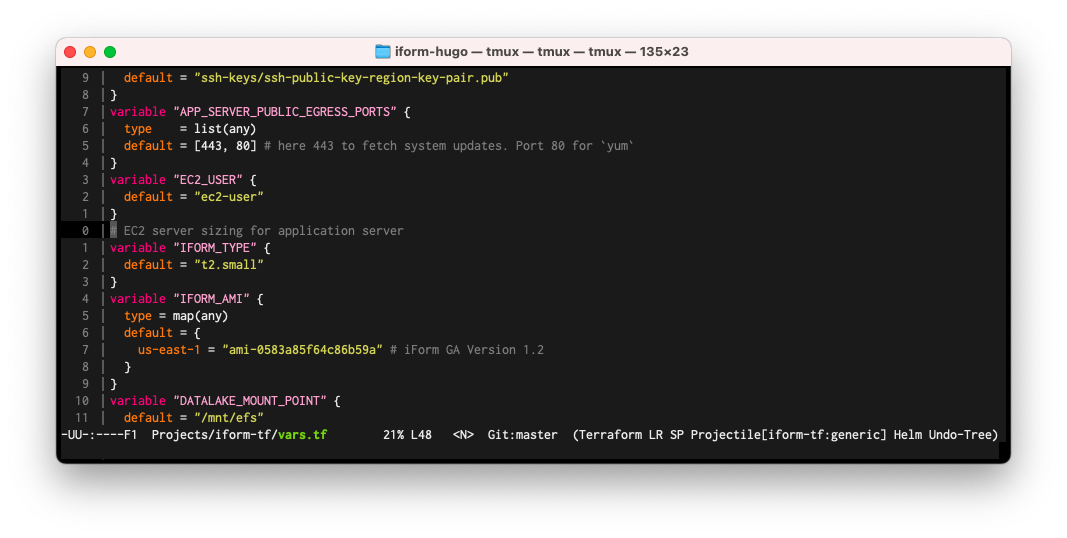
6. Recommendation on Amazon EBS sizing
By default the iForm Deployment Solution will create EBS volumes 25GB in size for both root and additional EBS volume where we host iForm source and related system files. We recommend following this sizing strategy. See the picture below for more information.
7. Application Server configuration
If you would like to specify sizing for your Application Server, you can change IFORM_TYPE.
8. Recommendation on Bastion Server configuration
In the vars.tf file, locate the following lines and consider changing BASTION_SSH_CIDR_BLOCKS according to the recommendation. You can also specify sizing for your Bastion Server by changing BASTION_TYPE.

9. Deployment
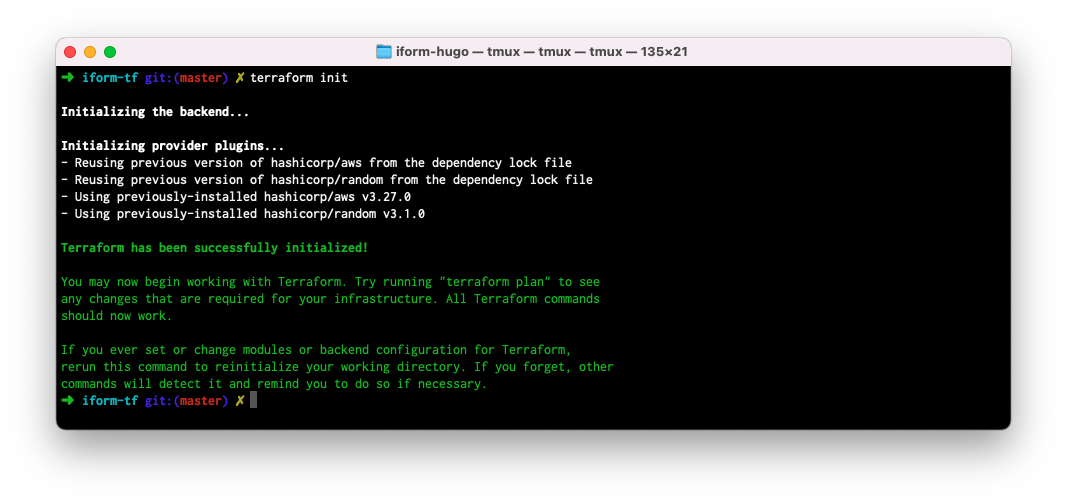
Before deploying your iForm Solution, you must initialize your local Terraform CLI tool. From the iform-tf directory, please run the following command to do so.
terraform init
You should see something like the following:
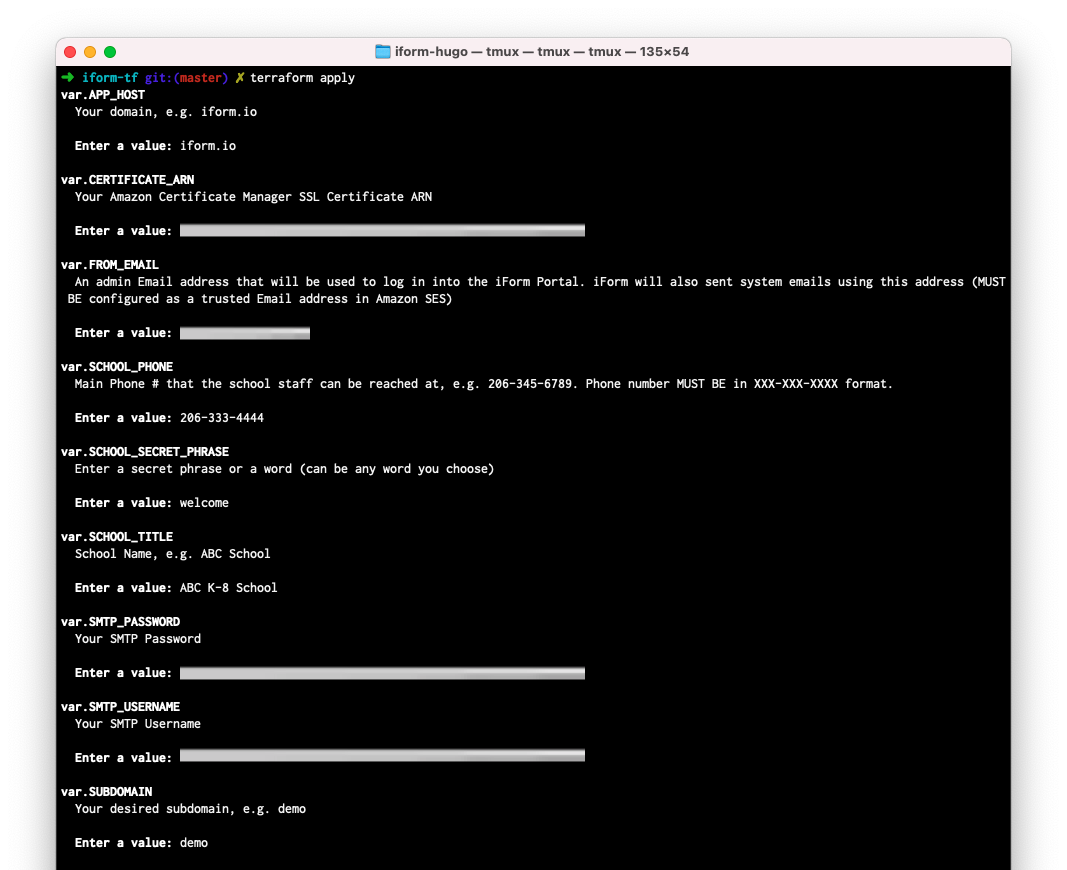
Now you are ready to run the terraform apply command to build and deploy your iForm infrastructure. You will be asked a few questions, such as your School Name, admin E-mail address, School Phone number, etc. Also, please prepare your SMTP Credentials and Amazon Certificate ARN. You will need those in this step.
Please note that your domain and subdomain must be the ones you have in your Amazon Route53 Service. In this example, we have iform.io and demo, respectively, so once deployed, your iForm App will be accessible from the domain demo.iform.io.
You should see something like the following:
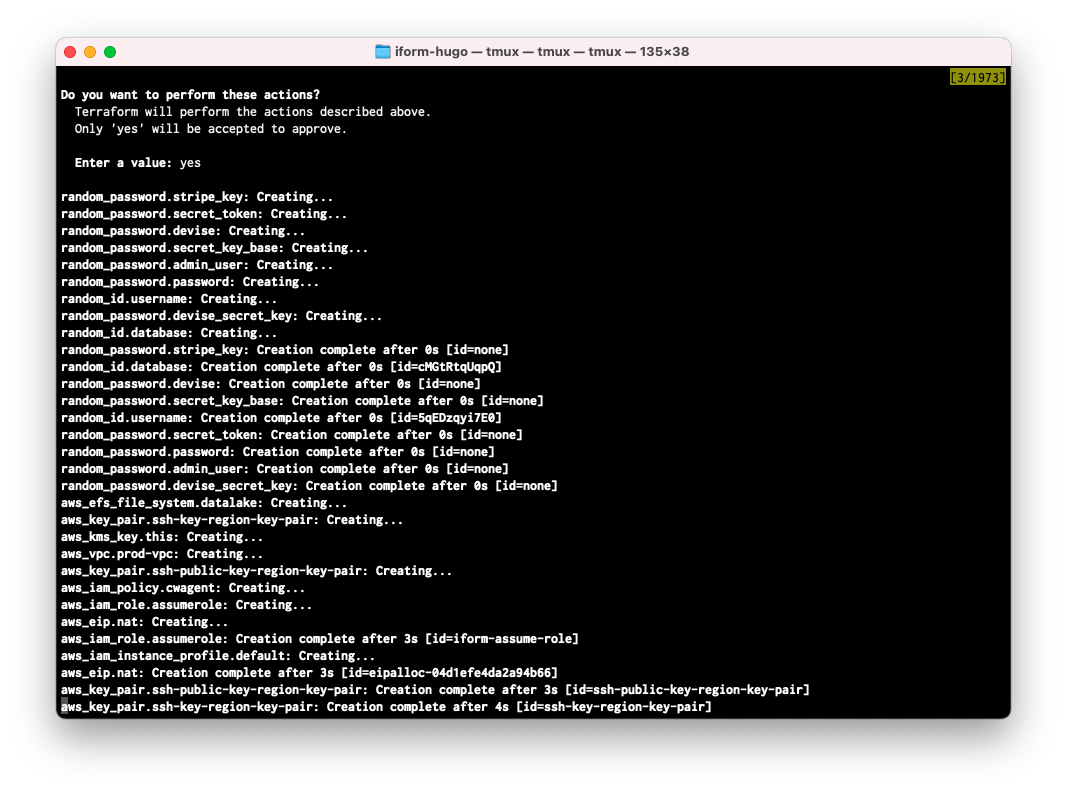
After the final question, you will see a lot of output (the plan above) and the last prompt to execute the plan deploying your infrastructure—type yes and press Enter.
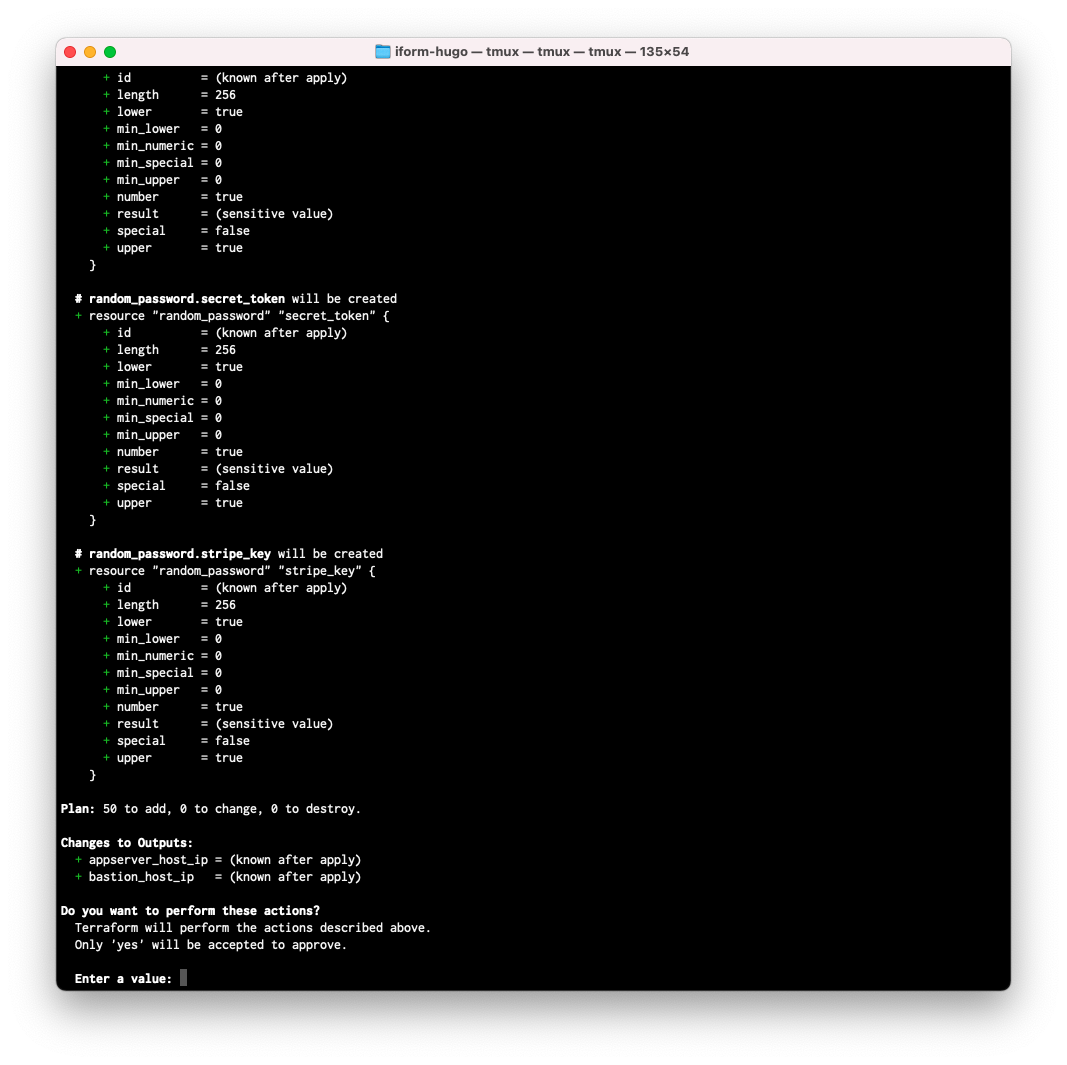
At this point, the Terraform tool executes the deployment plan and responds with the following output. Please note this command may take some time to complete.
Please allow 10 to 15 minutes to complete the process. You will see the following output when it’s done.
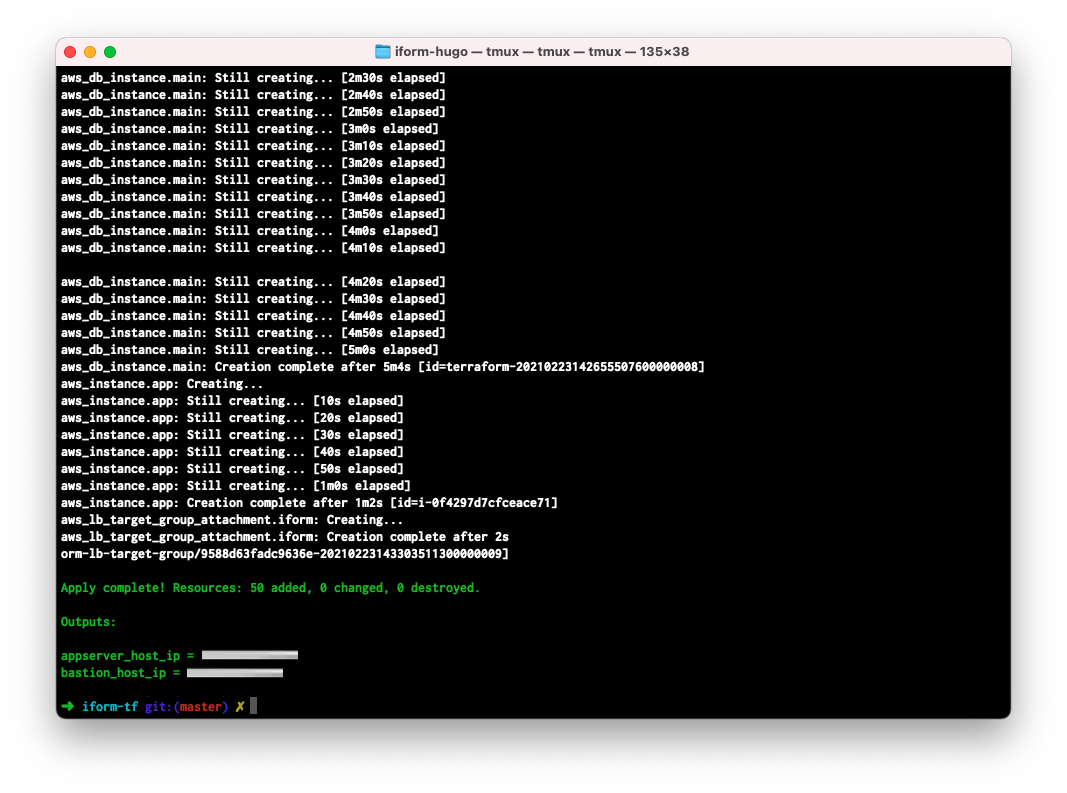
It’s time to update your DNS record in Route53 to point to your iForm Application Elastic Load Balancer.
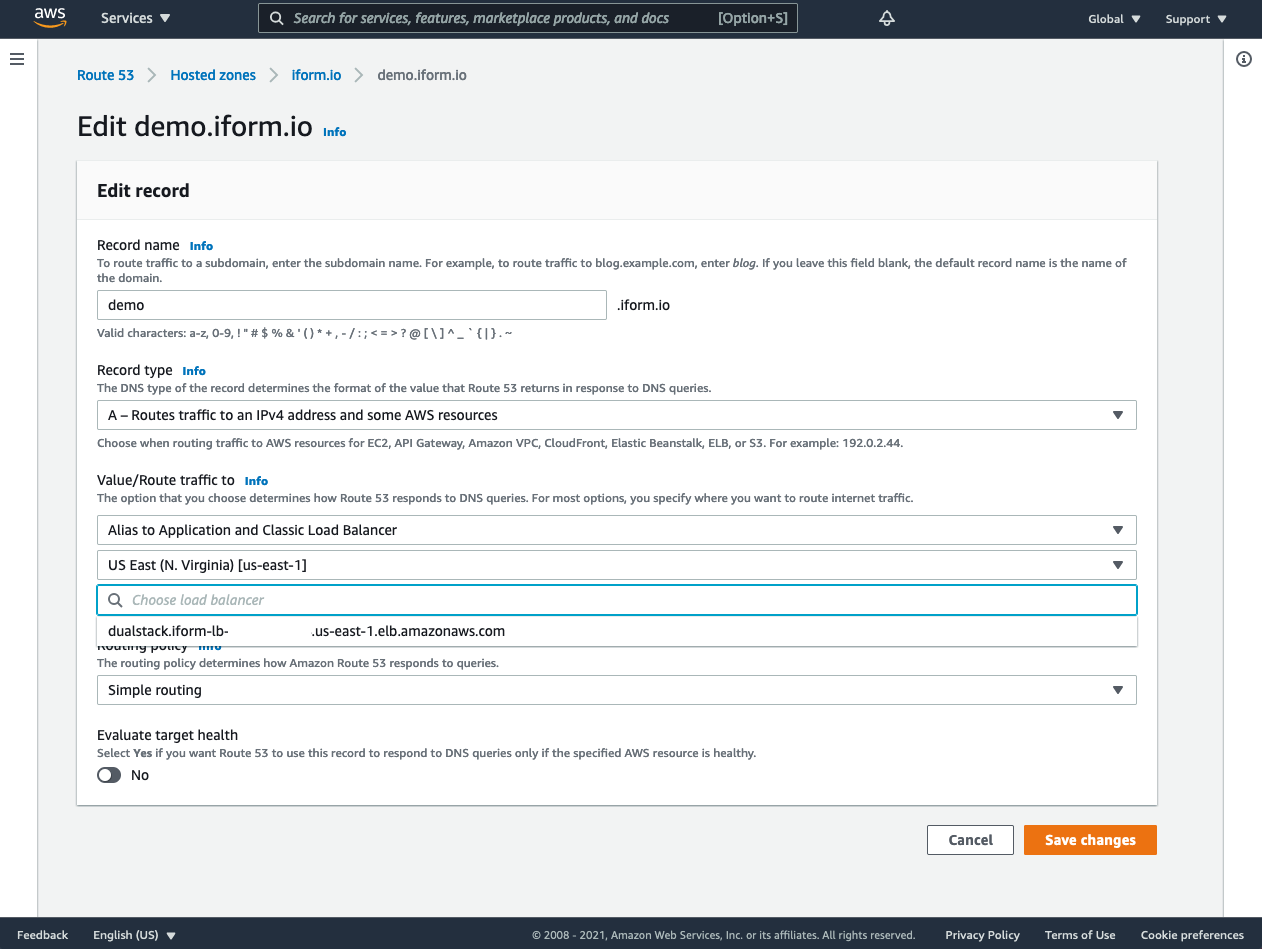
Press “Save changes”. At this point, you are all set and ready to use your iForm Solution.
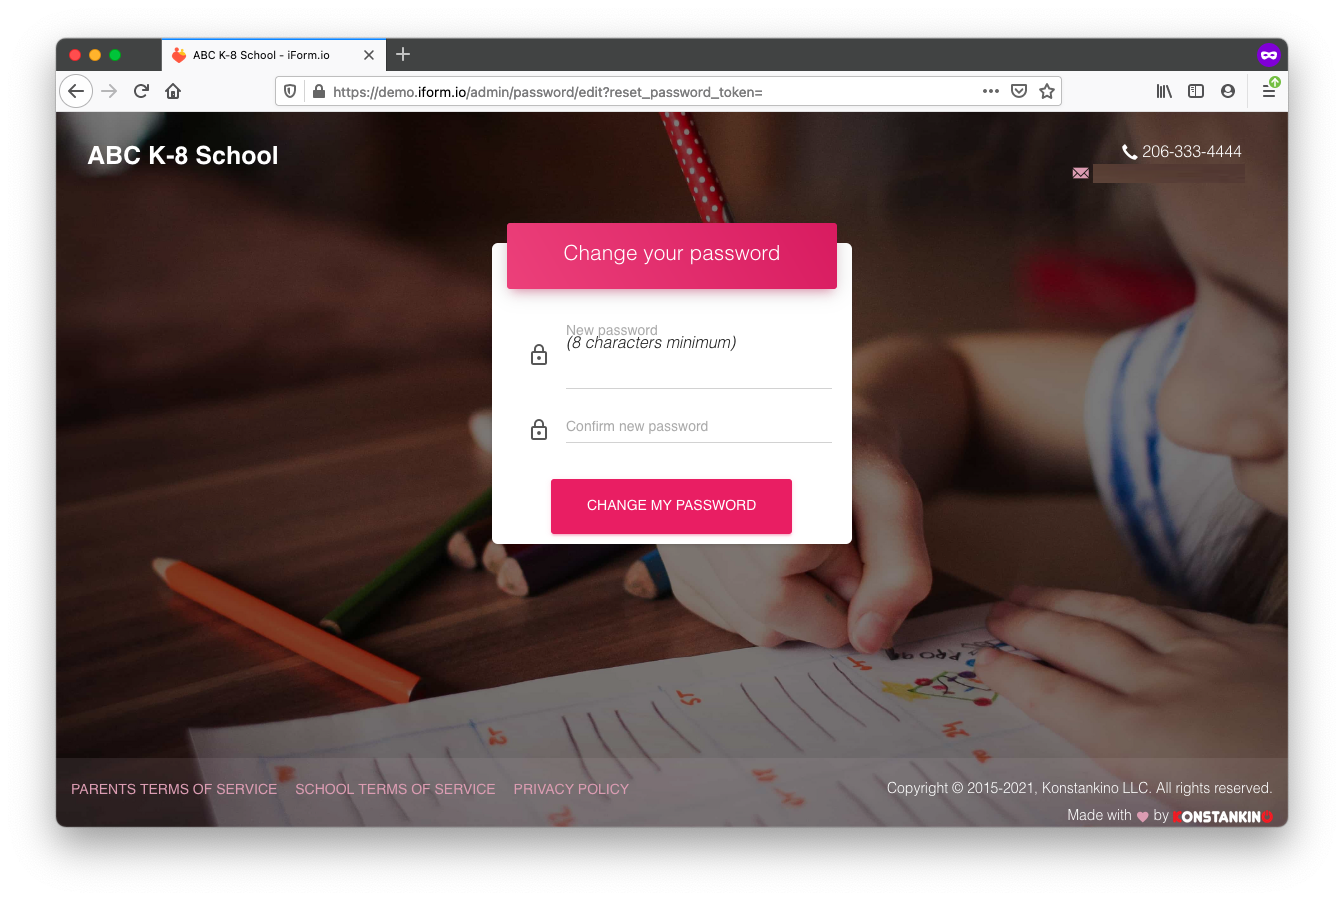
You should also receive an E-mail asking you to reset your admin password. The iForm will use the E-mail address you specified during the terraform apply command. Please follow the link in the E-mail to set your admin password.
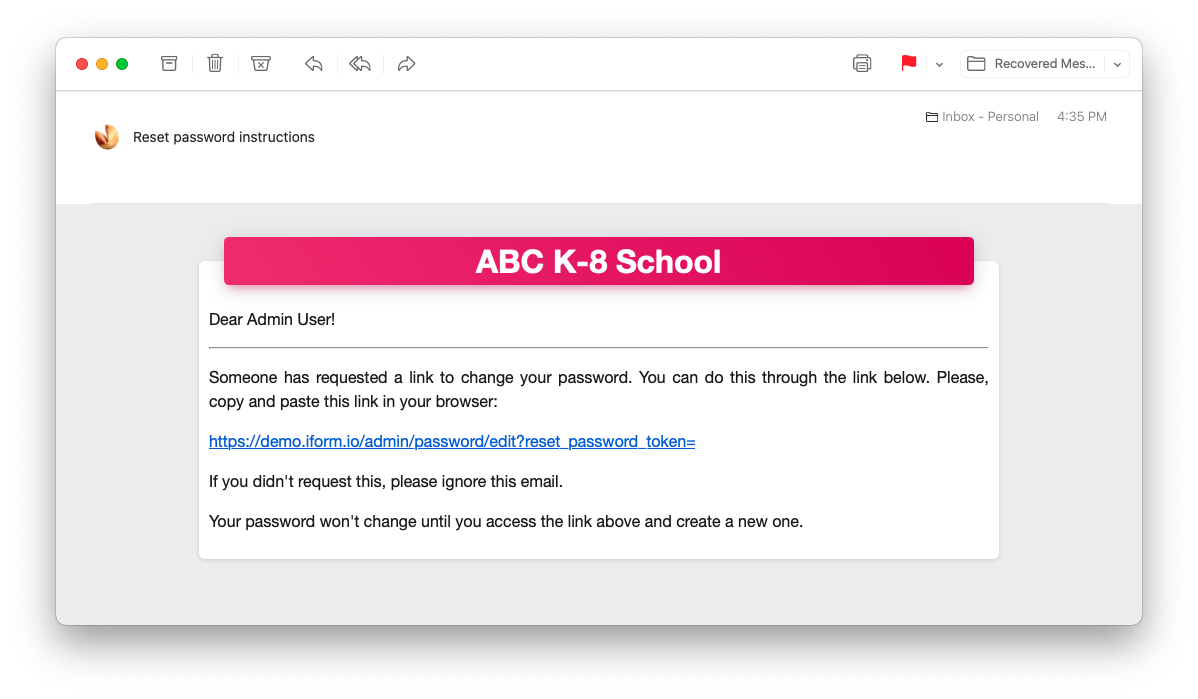
By clicking the link in the E-mail, you will land on the “Reset Password” page. Please set your admin password now.
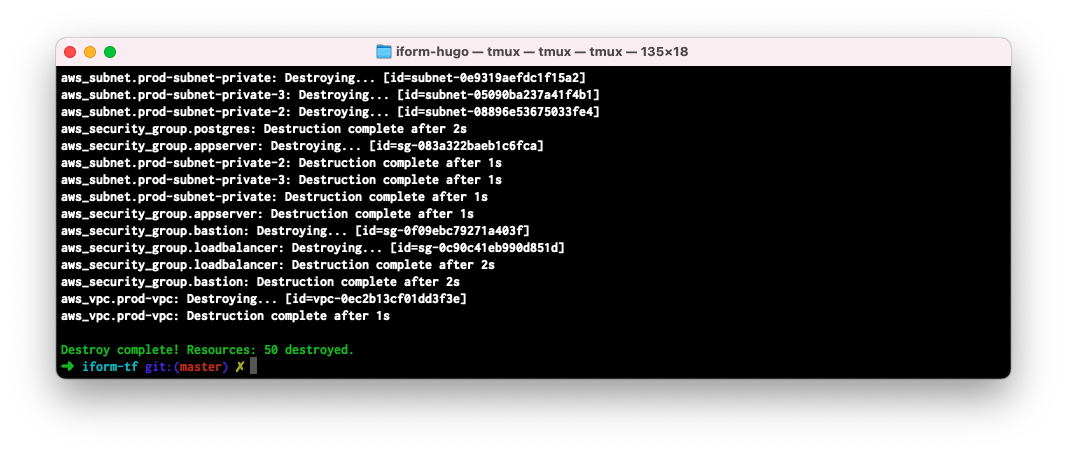
10. iForm Removal
You can remove the iForm Application and all related services from your AWS Account using the same Terraform template. Please note that you must keep your Terraform State file on your local machine. Otherwise, you will need to remove iForm manually. To delete iForm using Terraform, please run the following command:
terraform destroy
On prompt, for each question asked, you may press Enter. Finally, confirm the operation by typing “yes” in the last command prompt. The process will take 10 to 20 minutes, and you should see the following output.